
Steak doneness is a temperature, not a color.
Use an instant-read in the center of the thickest part. Pull the steak early for your culinary target. Carryover heat can raise the temperature while it rests. Color on the plate is a clue, not proof.
Target temperatures
Pull = the number when you take it off the heat. Rest = the number after 5–10 minutes. These are approximate culinary ranges, not safety thresholds. Carryover varies with thickness and cooking method; check the temperature during the rest instead of assuming a fixed rise. The photos illustrate possible center colors and cannot verify temperature or safety.
| Doneness | Pull | After rest | What you get |
|---|---|---|---|
| Rare | 120–125°F | ~125–130°F | Cool red center, soft |
| Medium-rare | 125–130°F | ~130–135°F | Warm red-pink center |
| Medium | 135–140°F | ~140–145°F | Pink center, firmer |
| Medium-well | 145–150°F | ~150–155°F | Faint pink line |
| Well | 155°F+ | 155°F+ | Little or no pink, dry risk |
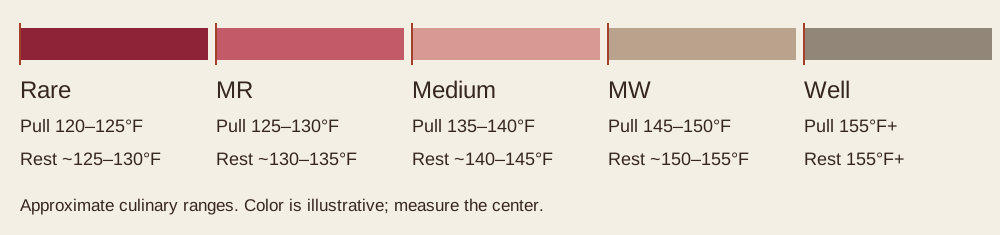
Tap a photo to enlarge. These existing images are illustrative; color does not prove temperature or safety. Matched D2–D6 photographs are planned replacements.
Illustrative colors and approximate carryover estimates. Resting does not guarantee a 5°F rise.
Where the probe goes
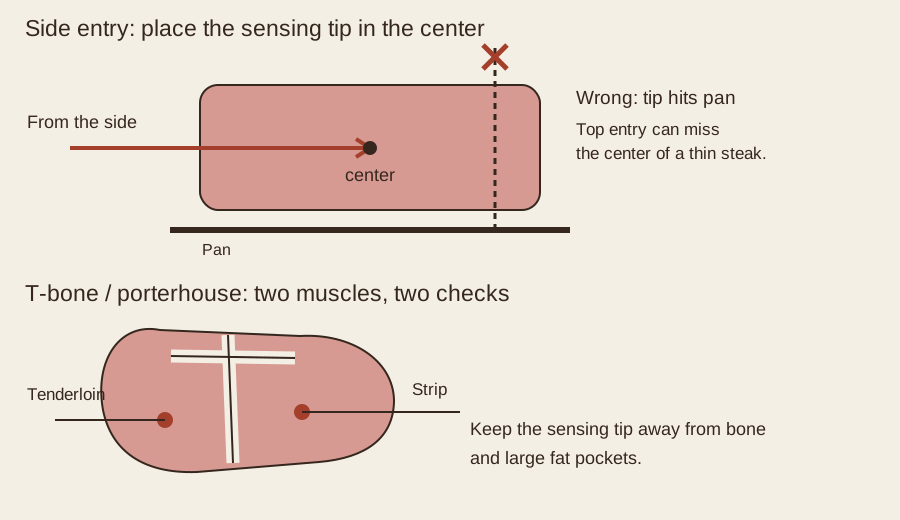
- Insert from the side so you can place the sensing tip in the center, especially on thin steaks.
- Put the tip in the geometric center of the thickest part, away from bone and the hard fat cap. Check the sensing area specified for your thermometer.
- On a T-bone or porterhouse, measure the strip side and the tenderloin side separately. They may finish at different times.
- If the reading jumps around, let the probe settle. You may be in a fat pocket or touching the pan. Back out and try again.
- Confirm in a second spot before you commit. Look for the coolest center reading.
Use a heat-rated leave-in probe in the oven or grill during reverse sear. Keep its cable within the maker’s heat limits. Use an instant-read as you approach the endpoint, after the sear, and during the rest. Choose one using the thermometer guide.
Rest is part of the cook
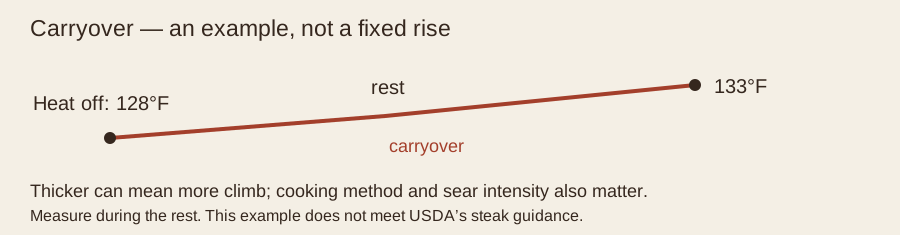
A hot exterior keeps transferring heat inward after the steak leaves the pan or grill. These are starting points for resting, not guarantees of a particular temperature rise.
- ¾–1 inch: about 5 minutes.
- 1.25–1.75 inches: about 5–8 minutes.
- 2 inches or thicker: about 8–10 minutes.
Tent loosely with foil only if the room is cold or the steak is huge. Tight foil traps steam and softens the crust.
Check the center during the rest. Carryover depends on thickness, the heat of the exterior and the cooking method. Gentle oven cooking may produce less rise than a hard pan sear. Resting helps you manage the right-hand column of the chart; it does not guarantee you will hit it.
For the USDA safety recommendation, reach 145°F before removing the steak from heat, then rest at least 3 minutes. A later rise from a lower pull temperature does not automatically satisfy that guidance.
Why color lies
- A reverse-seared or sous-vide steak can look pink from edge to edge even at a temperature you would call medium.
- A hard-seared thin steak can look gray at the edge and rare in the middle. That is a temperature gradient, not a reliable measure of the center.
- Smoke, mustard, soy and some rubs change or darken the surface. The crust does not tell you the center temperature.
- Cutting early does not instantly stop heat moving through the steak. Carryover can continue, though slicing changes how quickly it cools.
If the thermometer and the color disagree, believe a correctly placed thermometer.
Thin steak vs thick steak
Under about 1 inch: skip reverse sear. Use a hot pan or hot grill. Flip more than once if you want a more even cook. Check temperature early; thin steaks overshoot fast.
1.25 inches and thicker: use reverse sear or a two-zone grill. During the low-heat stage, 8–15°F below your culinary final target is a starting point for leaving room for the sear. It is not the final pull temperature or a fixed carryover allowance. Sear, then confirm the center temperature. Read the reverse-sear method.
For a steak between those ranges, adjust the heat and check early. The cast-iron weeknight method covers steaks about ¾–1.25 inches thick.
Checklist — tonight
FAQ
Is 130°F medium-rare?
As a final temperature after rest, 130°F is within this guide’s approximate medium-rare range. A pull reading of 130°F does not tell you the final temperature. Check again during the rest; the rise depends on the method and the steak.
Do I need to hit 145°F because of USDA?
USDA recommends reaching at least 145°F before removing whole beef steaks from heat, followed by at least a 3-minute rest. That is food-safety guidance, not a doneness style. The lower culinary temperatures in this chart do not meet it. Read the USDA temperature chart.
Why is my steak still raw in the middle and burnt outside?
The exterior received more heat than the center could keep up with. On a thick steak, reduce the direct heat or use reverse sear or a two-zone grill. Burnt rubs and a smoking, overheated pan can also make the surface taste scorched.
Can I use the finger test?
You can use touch as an observation. Thickness, fat and connective tissue change how a steak feels, so touch cannot give you a reliable temperature. Use a thermometer.
Does resting make an undercooked steak safe?
Resting is part of the USDA recommendation after the required temperature has been reached. It is not a substitute for reaching that temperature.
Should every cut have the same doneness?
Your preference still matters, but thickness and fat distribution change how a steak eats. Compare cuts and methods rather than assuming a single cooking time suits them all.
Can I use this chart for sous vide?
It describes culinary endpoints, not a pasteurization schedule. Sous vide safety depends on time, temperature and thickness. Use a validated method; do not interpret bath temperature alone as proof of safety.
Keep exploring
Temperature is the least BS part of steak. The shirt is optional.